Bluetooth Low Energy UUID View
In this view, you can choose to read/write UUID or use the Pair & Bond function upon the selected DUT. Before you use these features, ensure that the selected device supports Connect Request mode. This is the expected view after you have acquired the information from the DUT.
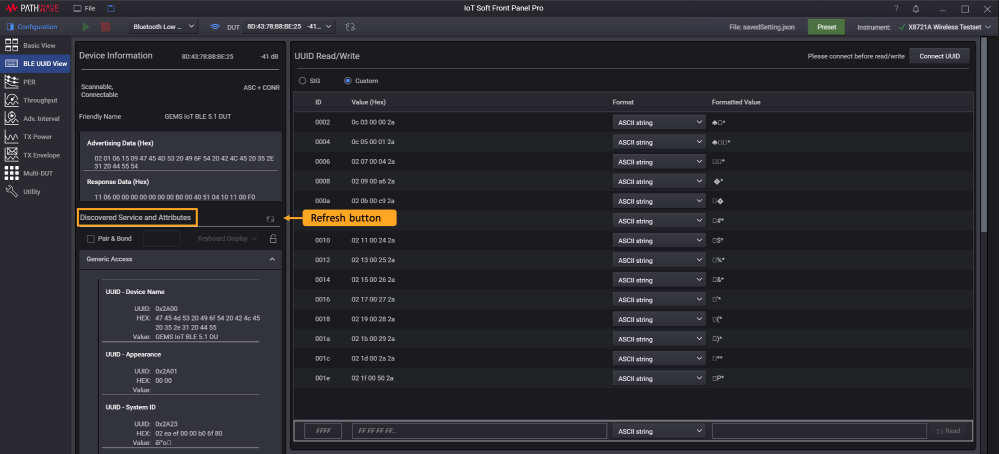
Discovered Service and Attributes
- Lists the UUID service and attributes discovered in two categories which are Generic Access and Generic Attribute. You can expand the list to view the items. Click the Refresh button to update the list.
-
If you have selected the 'Run Service Discovery during device activation' check box in the Measurement Settings (in Bluetooth Low Energy Test Setup Configuration), the UUID services will populate in this panel.
Pair & Bond
Generally, a standard Bluetooth device require either encryption or authentication before connecting to another device. For the X8721A to successfully access and modify the UUIDs and other functionalities within a device, it must first go through the following connection types with the DUT.
The Connection stage is first established and allows an unencrypted connection between the DUT and the X8721A. In this basic connected state it may be possible to access a number of generic UUIDs. Depending on the security of the device it may be necessary to establish an encrypted connection to read and write some UUIDs.
The Pairing stage often involves some level of user interaction to confirm the identity of the devices. The pairing process is where the devices will exchange some information to create short term keys. In Bluetooth 5.x there are a few different methods of pairing (Just Works, Pass Key, and Numeric Comparison…). These range from the most simple ‘Just Works’ to the more complex ‘Numeric Comparison’ methods. Once the short term keys have been exchange the devices can use them to communicate in a more secure manor to create more secure long term keys (LTK).
Bonding stage is the higher level connection where the DUT will use the long term keys to communicate securely with the X8721A. Once devices have been bonded they can skip the pairing process for future communications. With the DUT and X8721A bonded it is possible for the X8721A to read or write all UUIDs along with the access to other crucial functionalities such as changing a device name and alarm level. Note depending on the device it may be necessary to go through the pairing and bonding process after a DUT has been rebooted while other devices may store their LTK and persist through a reboot.
Go to Perform Read/Write UUID for instructions on how to use this feature upon the selected DUT.
The following are the indicators that you may see when you use this feature.
| Icons | Description |
|---|---|
|
|
Indicates that there are no device currently connected to the X8721A. |
|
|
Indicates that the device is currently connected to the X8721A but it is not bonded nor paired. |
|
|
Indicates that the device is successfully connected and only paired to the X8721A. |
|
|
Indicates that the X8721A has successfully connected, paired, and bonded (with security key) to the device. |


There are several types of generic access profile (GAP) bond manager supported by device. You must know the type of GAP bond manager supported by the device and make the selection in Soft Front Panel in order for X8721A to successfully bond to it. The default selection is ‘No input/output’.
When using the Pair and Bond feature, you will need to select any one of the options from the drop-down list. The selection will depend on the capabilities of the connected DUT.
| Options | Description |
|---|---|
| Display Only | Device will only display the six-digit security key. |
| Display Yes/No | Device either has a mechanism to indicate the 'Yes' or 'No' option or buttons mapped to these options. |
| Keyboard Only | Device will display keyboard or numeric pad for users to enter the security key but it will not show the numeric output. |
| No Input/Output | No user interaction is required as device does not have the ability to indicate 'Yes' or 'No' nor the ability to display a six-digit security key. |
| Keyboard Display | Device will display the keyboard or numeric pad for users to enter the security key and it will show the numeric output. |
UUID Read/Write
Select the type of UUID handles (SIG or Custom) to view the information after the software performs the service discovery. Selecting the SIG option will show the predefined ID as per the regulations. To read/write a custom value onto your device, use the Custom option.
Go to Perform Read/Write UUID for instructions on how to read/write UUID on the selected DUT.
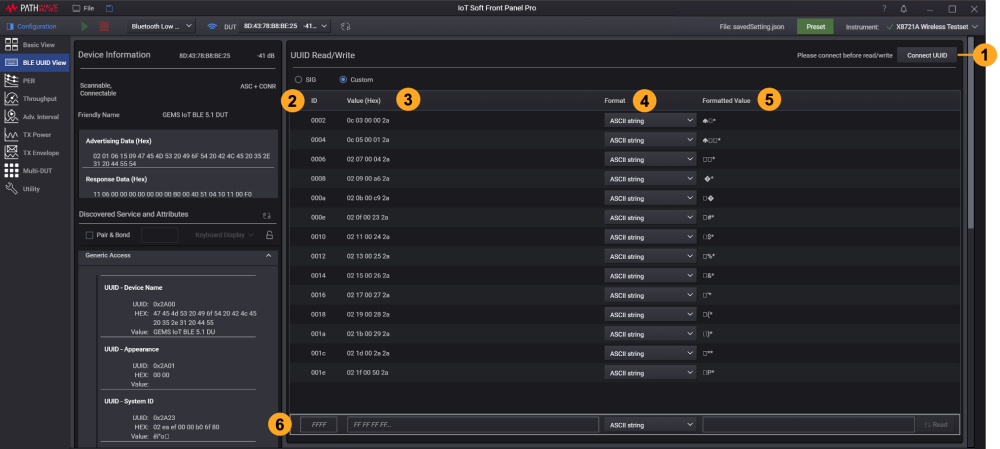
The description of the items labeled above are as described below.
|
|
Item | Description |
|---|---|---|
| 1 | Connect UUID button |
To read or write UUID, you must first connect to the connect request device. Note: At the end of the read/write process, you must click the Disconnect UUID button to disconnect the device before you begin using other features in IoT Soft Front Panel. |
| 2 | ID |
This is the UUID Handle ID.
|
| 3 | Value (Hex) | This is the associated value of the UUID in "ff ff ff ff" format. |
| 4 | Format |
In this column, select the format that you would want to convert the UUID value to a readable form. Options available are:
|
| 5 | Formatted Value | This column will display the converted and readable values. You can also directly enter the value here according to the desired format instead of entering the Value (Hex) column. |
| 6 | Edit bar | Use this edit bar to read or write a given UUID handle. Click the Read or Write button to read/write the values entered in the Value(Hex) column. If the field remains empty, it will switch to Read mode. |